If you want your home router to be accessible from the internet through an IONOS URL you will probably need to configure Dynamic DNS (DDNS). IONOS needs to know the IP-address, your purchased domain should point to for them to correctly redirect anyone calling your domain. In most cases your internet service provider (ISP) will assign your router a different IP-address every day. For that reason you can’t just give IONOS a static IP-address once and be done with it. You’ll want to automate giving IONOS your routers IP-address through configuring Dynamic DNS in your OPNSense router.
Set up IONOS developer account
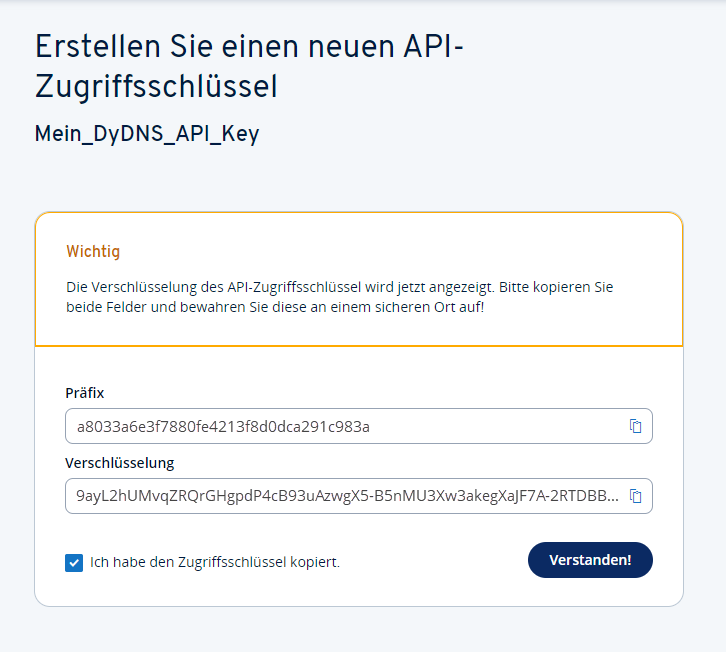
First go to the IONOS API Developer portal and create a new key with any name you’d like. Finally there will be a public prefix and a private key displayed. The private key will not be displayed once you close the popup so it is best to note down both of these keys securely for later use.
Get the update URL
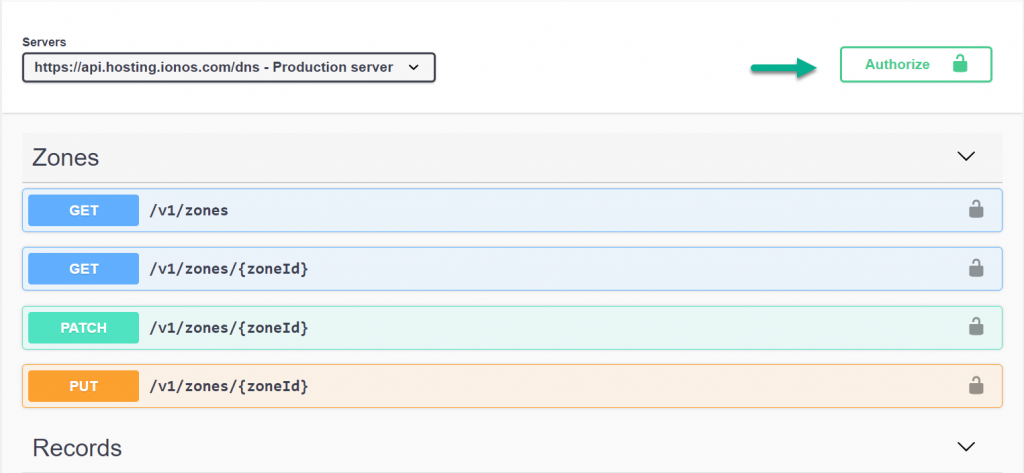
To update the dynamic DNS entry for your domain you will need to call a custom URL given to you by IONOS. To get this URL go to the DNS API documentation page. On the right side of the page click on “Authorize”. In the opening dialog you will need to put in the two keys you obtained in the previous step in the form PREFIX.PRIVATE_KEY. Not the dot in the middle of the keys. Finally click “Authorize” and “Close”.
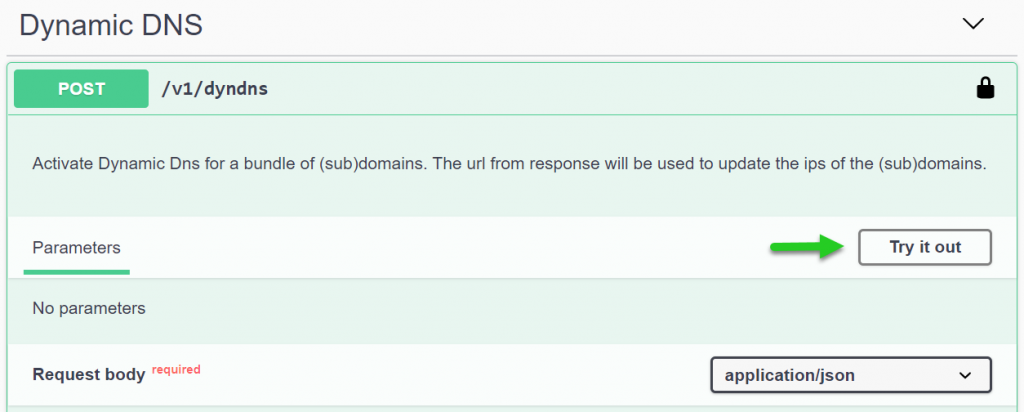
After you have authorized yourself you can access the API. Go to the “Dynamic DNS” section and open the POST entry. In the top right corner of the opening panel click on “Try it out”. A text box will appear a bit further down.
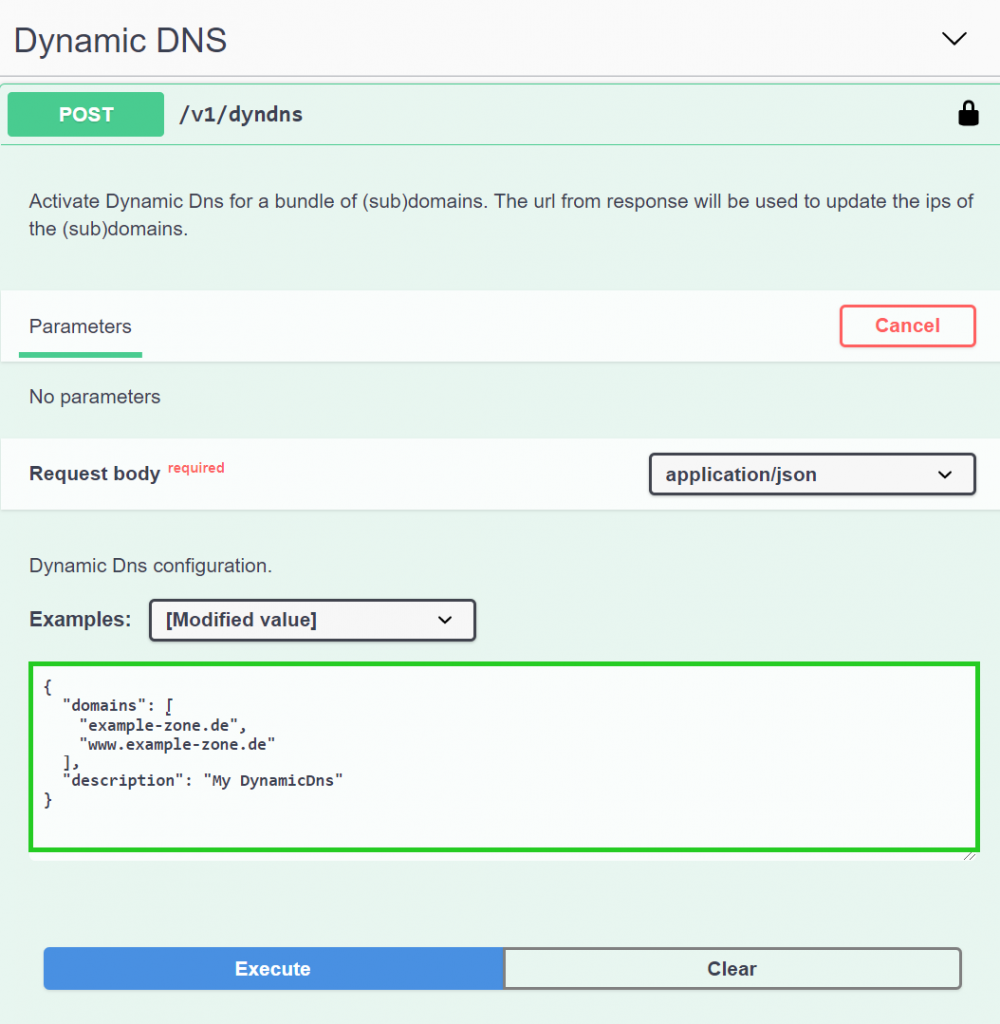
Edit the default text in the textbox to contain all domains and subdomains you’ll want to automatically update. Every domain needs to be surrounded by quotation marks and seperated from the others by a comma. Just like the default text.
If you want also change the value of the description field, but this is optional. Finally click on “execute” below the textbox.
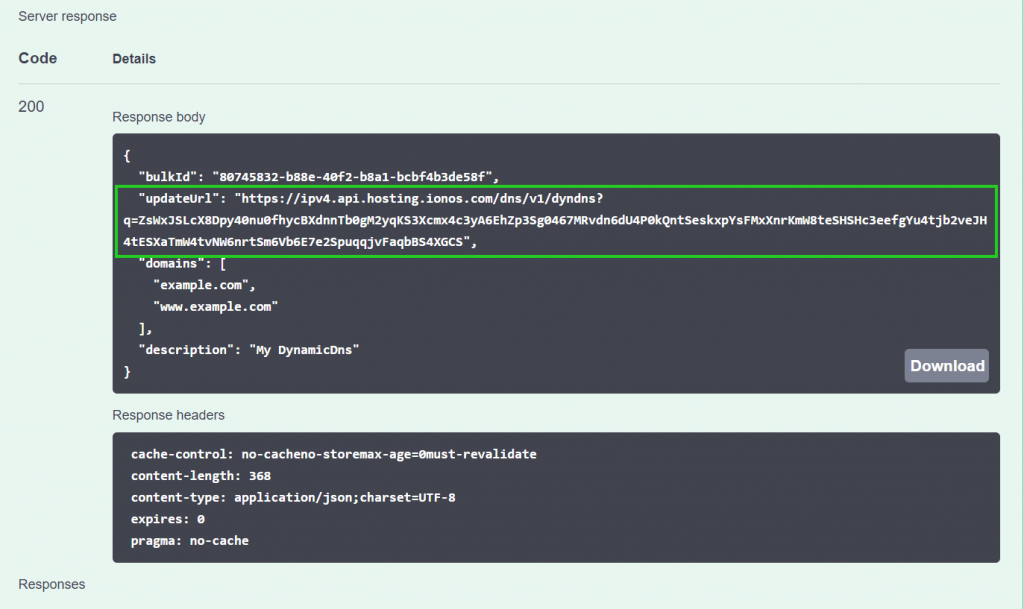
The server will now generate a custom update-URL for you and return it. You can retrieve it if you scroll a bit further down to the responses section where it should say 200 on the left. Within the black box you’ll find a key called “updateUrl”. Copy the URL within the quotation marks right behind this key. It should start with https:// and will probably go over multiple lines until the next quotation mark and comma.
Configure OPNSense
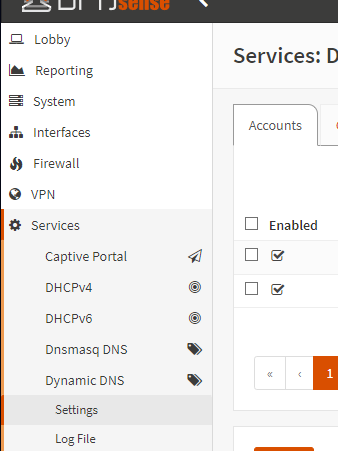
Once you have the update URL you can switch over to the Web-UI of your OPNSense router. Open the Dynamic DNS settings under Services > Dynamic DNS > Settings.
If you can’t see the Dynamic DNS service you might need to install the os-ddclient plugin under System > Firmware > Plugins.
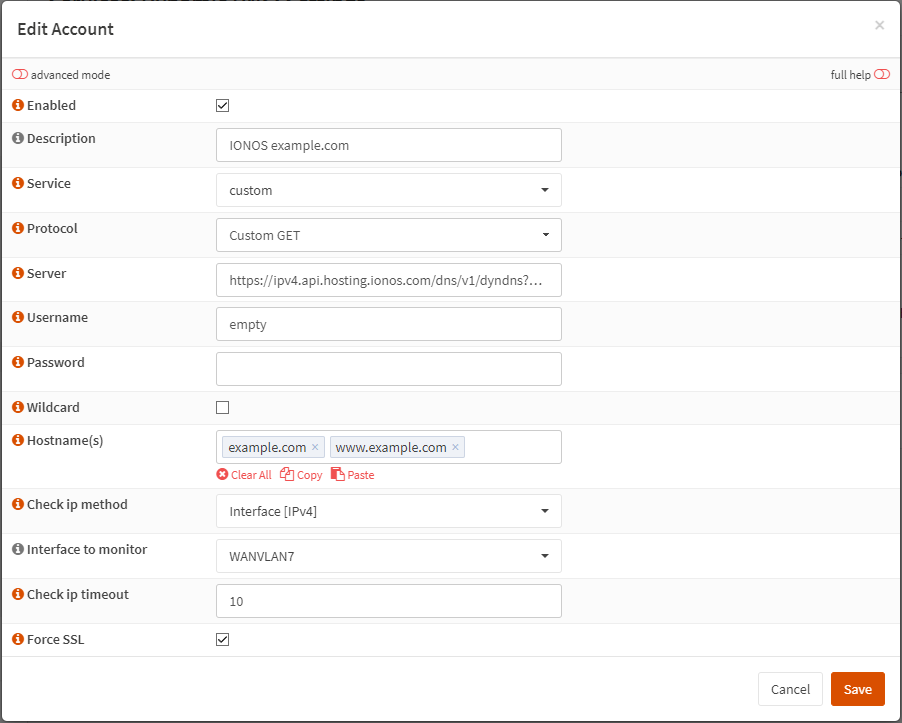
Lastly add a new Entry under Accounts. There are only a few things you’ll need to set in the opening dialog:
Description (optional) Give the Account a good description to better recognize it later.
Service Select “custom”.
Protocol Select “Custom GET”.
Server Here you’ll need to paste the update URL you got from the IONOS API earlier.
Username You might need to write something in this field although it is not required. Just type anything, like “empty”.
Hostname(s) (optional) This field is optional again but for better understandability you should input all the domains you want to update.
Check ip method Configure the method with which OPNSense should check for IP-address changes. Usually you listen to one of your OPNSense interfaces. This would mean select “Interface [IPv4]” here.
Interface to monitor Select the interface which should be monitored for IP-address changes. Probably your WAN interface.
Finish the configuration by clicking on “Save” and “Apply”.
The update might not work already. What you need to do in this case, is to set the Backend under General settings to “native”.
Result
It might take a moment but the Current IP-address under Accounts should now updated with your current IP-address. Also in within your IONOS account you should see the IP-address update. Whenever the interface updates its IP-address from now on, OPNSense will automatically notify IONOS of the change and you will be able to access your home network from your custom domain.
When you are having issues in games with a P2P (peer-to-peer) in Windows you might want to try resetting your DNS-cache. It fixed high ping issues in Garry’s Mod and Risk of Rain 2 for me.
Resetting the DNS-cache
Press the Windows-Key, type cmd and hit Enter. A mostly black window will open. Here you need to type 2 separate commands:
ipconfig /flushdns
netsh winsock reset
Press Enter after each one and finally restart your computer.
These commands will clear your DNS-cache and reset the winsocket programming interface used for the network connection.
If you are in the market for a new PC monitor you might realize that monitors pack a lot of features. Only some of them will actually matter to you but how do you know which ones? With this post I want to help you understand what all the information in the datasheet actually means. You will learn which monitor specs you should look out for when searching for a new screen. It doesn’t matter if you need an office monitor, a gaming monitor or have a completely different use case. At the end of this post you will know exactly how to find the monitor to buy.
Physical monitor specs
The most important features of a monitor are the physical aspects. Your new monitor can be the best on the market but if it doesn’t fit on your desk it is useless to you.
Aspect Ratio
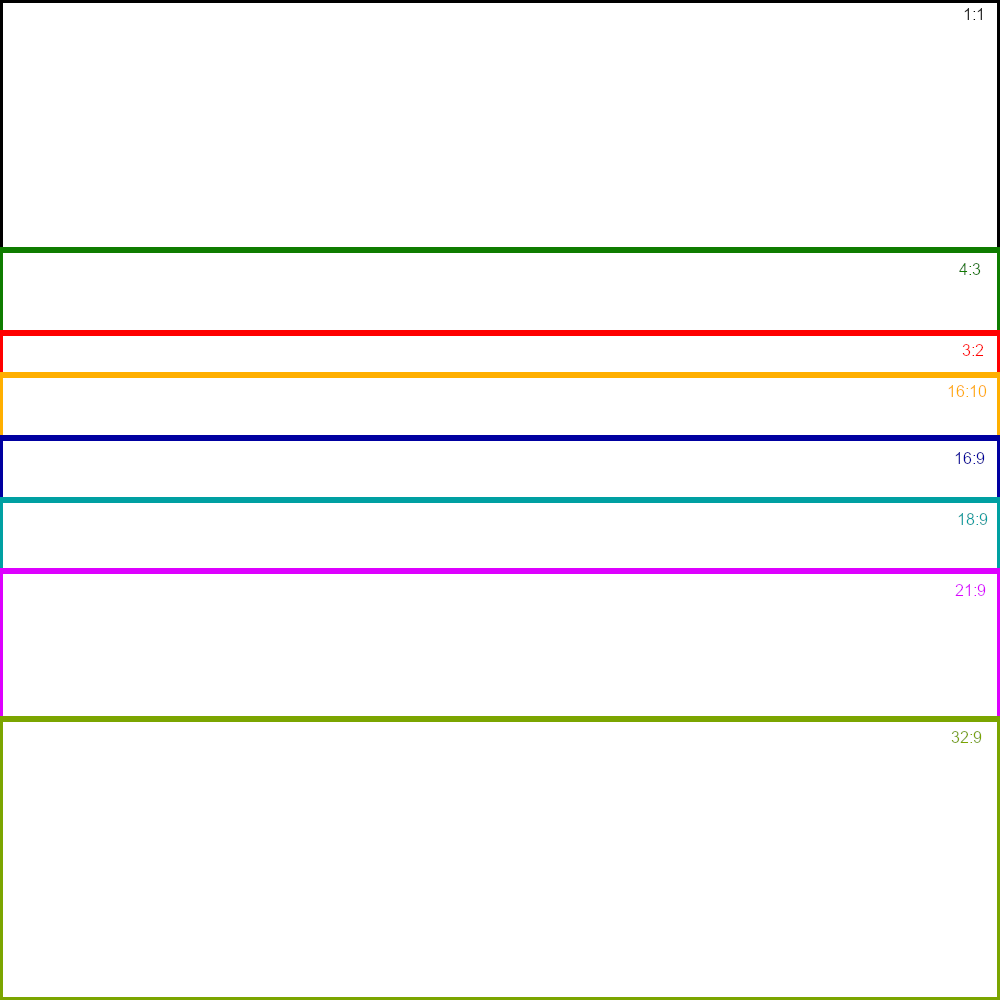
The first feature of your new monitor you need to think about is the aspect ratio. Still the defacto standard for PC monitors is 16:9 [16 by 9] which means that the display is 16 parts wide and 9 parts high. An aspect ratio of 1:1 for example would mean that the monitor is square.
Visualization of the most common aspect ratios
In the above graphic you can see the most common aspect ratios visualized. 4:3 you will see mostly on older monitors. The most options today will you find with an aspect ratio of 16:9. Some newer monitors and especially laptops are actually going back to less wide screens. Examples include the Microsoft Surface devices or the Framework Laptop. PC monitors and mostly modern smartphones on the other hand are trending more towards wider screens. Monitors can go up to 32:9 at the moment like this LG Ultrawide.
The aspect ratio you’ll want depends on your preference and on what you plan to do with it. If you use a lot of programs which have large ribbons at the top and bottom of the view like MS Word or Excel you might appreciate the extra height of the 3:2 aspect ratio. For more immersive experiences you might like a wider aspect ratio. A good middle ground is the 16:9 aspect ratio and will give you the most amount of options to choose from as it is the most widespread one.
Resolution
Choosing a resolution goes hand in hand with the aspect ratio and screen size you choose. The resolution means the actual number of pixels your screen has. The more there are, the more crisp the image will be. But keep in mind that there are also more pixels which need to be rendered by your computer. For browsing the web or smaller games this probably won’t matter, but for bigger games you should make sure that your GPU can handle this many pixels in game.
The resolution is typically denoted as the number of pixels along the width of the screen, times the number of pixels along the height of the screen. Occasionally you will see people talk about a resolution like 1080p or 1440p. This notation declares the vertical resolution: 1080 or 1440 in this case. The little p just stands for word “pixel”. The horizontal resolution in this case is inferred by the aspect ratio which typically is 16:9.
Some resolutions, especially for 16:9 aspect ratios, have a distinct name or standard. You might have heard of Full-HD, WQHD or 4K before. The table below displays some of the most common resolutions for PC monitors together with their aspect ratio and total pixel count.
Name
Aspect ratio
Width (px)
Height (px)
px total
HD
~16:9
1360
768
1.085.280
Full-HD
16:9
1920
1080
2.073.600
UWFHD
~21:9
2560
1080
2.764.800
(W)QHD
16:9
2560
1440
3.686.400
UWQHD
~21:9
3440
1440
4.953.600
4K/UHD
16:9
3840
2160
8.294.400
Common display resolutions with their name and pixel count.
Screen Size
The size of your screen is the last major physical monitor feature you need to think about. The dimensions of a monitor mostly depend on the actual screen size which is usually noted in inches in the datasheet. On modern displays there aren’t any more significant bezels around the screen and the depth of a monitor is negligible as well. So your concern here should be the diagonal inches the screen has. Keep in mind though that a 32″ 32:9 monitor is wider than a 32″ 16:9 monitor.
Other than your desk space, the screen size is mostly your preference and how far you usually site away from your monitor. There is this site which has a good overview of different different resolution, screen size combos and how far you should be away from it. You should check it out to better understand what size of a monitor you should get.
Which physical monitor specs should you choose?
Now that you know what aspect ratio, resolution and screen size actually mean you can choose which one to get. First you should get to know which size of screen you want. This mostly depends on how much desk space you have and how big of a monitor you need/want. While choosing the size keep the aspect ratio you prefer in mind. A 32:9 monitor will use as much desk space as two 16:9 monitors.
The most common sizes used are 24″ up to maybe 32″ 16:9 monitors. For me personally two 27″ monitors are the way to go but I have actively used monitors in all three sizes. In terms of resolution I’m personally a huge fan of the 1440p WQHD resolution. It results in a notably clearer image than Full-HD while having less than half the amount of pixels than 4K. Below 24″ Full-HD is probably enough while on larger screens above like 32″ you might want to consider going with 4K.
Less important physical monitor specs
Monitor stand
Less important for your overall experience but not irrelevant is the monitor stand. Pretty much all monitors come with one and they decide how adjustable your monitor is. Some allow the screen to be moved up and down and swiveled side to side. More advanced stands even allow rotating the screen into a vertical orientation.
Besides the monitor stand itself it is more important to look at a VESA compatible mount in my opinion. VESA is a company which defines display standards. A VESA compatible mount is a set of screw holes on the back of the monitor which allows the monitor the be mounted on a third party monitor stand or even a wall mount. If your default monitor stand does not have the adjustability you need, you have the option to add them later with a third party stand and a VESA mount.
Panel type
Displays have different techniques to display an image. All of them come with different pros and cons and the discussion on what to choose justifies a whole separate blog post. In short though, there are four main panel types: TN, VA, IPS and OLED. All of them have various alternations but the general advantages and disadvantages usually still apply.
TN is the oldest of the bunch with the worst picture quality but the fastest speed. It is the cheapest technology but with the others not necessarily that much more expensive and better picture quality, TN is not that popular anymore.
IPS has a good picture quality and can reach fairly high speeds nowadays as well. It is slightly more expensive than TN and VA.
VA is pretty much the middle ground out of TN and IPS. With that said, all of these three panel types have become so cheap that IPS is probably the best option out of these three.
OLED is the latest advancement in panel technology and is still advancing fast. It is way more expensive than all the other three types across the board but gives you objectively the best picture quality. With OLED all the pixels are individually light up which allows for a good HDR quality for example. This also means that they are usually a bit dimmer than other screens and they might suffer from burn in. You should do more research before pulling the trigger on a OLED display. They look great though 🙂
Curved monitors
You will find some bigger monitors which do not have a flat screen. They are slightly curved. The purpose of this curve is to give the user a more immersive experience. After having used a curved screen myself, I can absolutely recommend it but it is not a must have for me. Especially on lighter curves you won’t actively notice it in the daily usage.
You can check if a monitor is curved by looking at a value like “1300R”. This value states the radius of the curve in millimeters. Imagine a circle where you are 1300mm away from the sides in the center. The circle has a radius of 1300mm. A Monitor with a curve of 1300R will have its screen bend just like the curve of this circle. This means a higher R value leads to a lighter curve while screens with low R values like 800R are noticeably curved.
Other monitor specs
Once you have figured out which size and resolution your new monitor should have you are almost done. If you just need something cheap that works and will be using it more casually you can stop reading right here. Just choose the cheapest monitor which meets your dimensional needs, do a quick 3rd party review check to see that it’s not complete crap and buy it. Following I will be explaining the most common and important features of a computer monitor which might be relevant for you if you want any more than the absolute minimum.
Refresh rate
Refresh rate describes the number of times the display can refresh the image per second. It is usually denoted in Hertz (Hz) and can be somewhere between 30Hz and 500Hz. Why does it matter? The higher the refresh rate, the smoother the image will feel. And not just the feeling will be different, in esport applications you might be able to have a slight advantage over your opponents. When there are more image refreshes per second, it takes less time for your and your opponents actions to appear on the screen. So you get less input lag in addition to a smoother image.
Obviously it is better to have one of those new fancy 500Hz monitors. That being said it is hard to feel a difference above 240Hz and even the difference between 120Hz and 240Hz is hard to notice.
Whatever your use case is, ensure that your monitor has at least 60Hz. Anything below feels really sluggish and is actually hard to use. Most monitors should meet that criteria though. If you like a smoother feeling have a look at some higher refresh rate monitors. You can get ones with 75, 100, 120 or 144Hz for example. All of those will feel noticeably smoother than 60Hz. If your are regularly gaming have a look at monitors with at least 120Hz. As I said earlier they feel noticeably smoother than 60Hz and they really come down in price. It is not much more expensive to get one with a higher refresh rate and it absolutely levels up your gaming experience.
Variable refresh rate
Variable refresh rate (VRR) is a technology to synchronize to refresh rate your computer is calculating with the refresh rate of your monitor. What this does is eliminate tearing and lower the input lag. Tearing is a sort of visual artifact where you have a sort of cut in your image for a split second, as one part of the screen rendered an older frame as the other part of the screen.
There are multiple standards out there which implement VRR. Which one you need depends on the GPU you have in your PC. You might see the monitor spec sheet stating something like “AMD FreeSync” or “Nvidia G-Sync”. Despite its name, AMD FreeSync might be compatible with None-AMD cards. There is an advanced version called “AMD FreeSync Premium Pro” which also supports Nvidia GPUs for example. G-Sync on the other hand is only compatible with Nvidia GPUs but if a monitor supports G-Sync, it usually also supports FreeSync as there are no additional costs for the manufacturer.
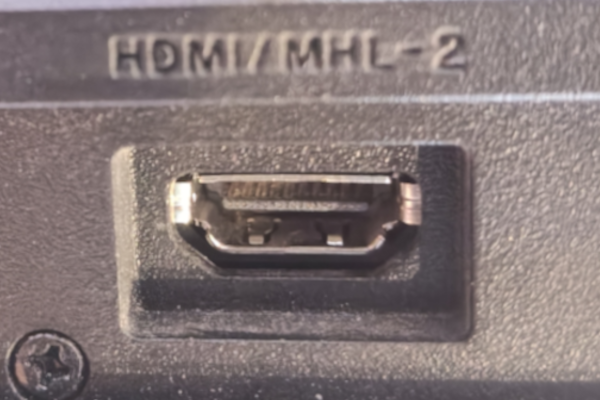
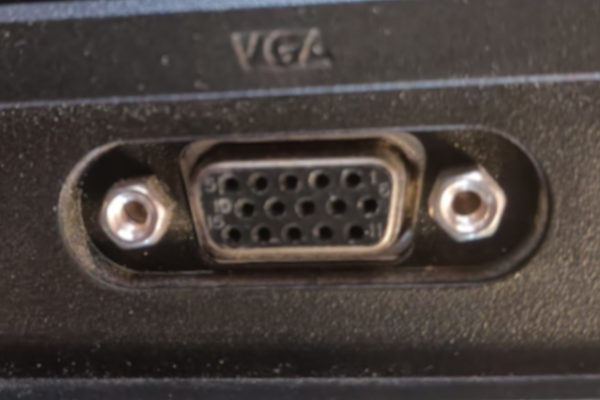
Monitors obviously need some way to send a video signal to them for display. On televisions you will usually only find HDMI. On a PC monitor there are a couple more options. Besides the well known HDMI connector, there is also DisplayPort and sometimes even USB-C on modern monitors. Yes, USB-C! Besides being the same connector like on smartphones or Laptops you can’t just connect any USB-C device to it. It needs to be able to carry a DisplayPort signal. Also the USB Port on the monitor needs to be able to be used as a display input. Some are just for power delivery or for a USB hub. So if you plan on using USB-C as a display connector, make sure both sides of the cable support this config. You can usually find this info in the spec sheet or manual of the corresponding device.
On older monitors and PCs you might find some other connectors like VGA, DVI-I and DVI-D. It usually doesn’t matter which one you choose since you can buy adapters to convert to and from pretty much all of them. Only for higher resolutions and refresh rates you might check that the ports actually support this amount of data. HDMI and DisplayPort usually have a version number per port which basically defines how much data it supports. You won’t need to worry about this too much though as most monitors today come with at least one HDMI and DisplayPort which support the max resolution of the monitor.
DisplayPortHDMIVGA
USB-connections
Some monitors have USB-connections on the back besides the display connectors. Some might function as a simple USB-hub, others might be able to function as a KVM switch, so that you could use the same set of keyboard and mouse for two computers without replugging anything.
Audio
As you might know HDMI and DisplayPort can not only carry video signals but also audio signals. To use this functionality some monitors have speakers just like TVs. Others might just have a 3,5mm headphone jack for you to connect headphones to. Not all monitors can handle audio signals though.
Reaction time
A lot of monitors will also state a reaction time. Most of them will just say 1ms GtG. This means that the display takes 1ms to change the image from Gray to Gray again. If this value is too high you might see some shadows behind text when moving a window around on the screen. OLEDs are known for a quick reaction time but besides that refer to third party reviews to make sure the reaction time is in an acceptable range. The values on the spec sheet can be very inaccurate.
HDR
High dynamic range (HDR) is a special display mode which needs to be supported by the content you are watching and your monitor. It greatly improves the image quality by lowering the brightness in darker areas of the screen while increasing the brightness of other parts. The safest option to see if a monitor supports HDR is to look for the VESA certification. There are multiple VESA DisplayHDR Standards ranging from 400 to 1400 and True Black 400 to True Black 600. Higher numbers mean greater HDR quality.
Conclusion
Now that you understand the most important monitor specs you should be able to accurately decide which monitor is the best for you and your budget. Before buying a monitor you should, just like for any other product, check some third party reviews on it. There are some details that will not be denoted in the monitor’s spec sheet, like color accuracy or potential faults with the monitor.
I recently build myself a mostly printed CNC (MPCNC) but without a controller the stepper motors don’t do a lot. When I started researching my options I fell into a deep rabbit hole about different options. Fortunately the options are at least a little bit limited if you are looking for cheap solutions. In this blog I want to document a variety of different options you can use to make your life this little bit easier.
Hardware
Something you will absolutely need is some sort of controller actually driving the stepper motors and potentially reading the end stops or the mill itself. There are the “off the shelve”-solutions which usually come with some kind of interface to control the CNC and a finished board where you just need to connect your stepper motors to. Prices range from 50-100€ for simple solutions like the Pokeys57E which probably aren’t enough for a MPCNC already up to enterprise solutions for a couple thousand Euros. These boards will almost always be the least customizable options with the worst price to performance ratio.
Arduino or Raspberry Pi?
If you are somewhat familiar with the DIY community you probably heard of Raspberry Pis and Arduinos. On a budget, your CNC controller will probably use at least one of these two. My personal solution will probably take both of them in combination. As the actual controller though you probably want an Arduino based solution. Unless you have a RaspbPi already, the Arduino can do pretty much all the same stuff for cheaper and in addition to that you get more options for CNC shields and more learning resources.
Comparison of the most interesting CNC shields for you budget CNC controller
For me in Europe there seems to be only two real options to consider. Of course there are other boards you can get. They usually are more niche or have the chip directly soldered on to them. Replacing/upgrading them gets more expensive that way which is why I’m not considering them. Also I already have an Arduino Mega lying around which I would like to use for this project. On the other side of the ocean in the US there a couple more options. Namely the Ultimachine boards RAMBo and Archim, the SKR Pro and the Jackpot CNC Controller. Especially the Jackpot Controller looks interesting to me. It ticks pretty much all the boxes for a good beginner CNC controller and with its various expandability options you will be settled for quite a while.
Which controller did I choose?
Since I’m not in the US and don’t want to spend 40$ on top of a 60$ controller for shipping I will have to choose between the Ramps 1.6 and the Arduino CNC Shield. Both of them cost about the same and spec wise the Ramps Controller is just better. It supports up to 5 drivers for stepper motors. 2 of which were intended for Extruders, since this board was generally designed for 3D printers, but there a custom firmwares and configs which allow them to be used for a second x-axis stepper motor for example like on the MPCNC. This enables the option to have autosquaring which the CNC Shield does not support.
Stepper drivers
Stepper drivers are little modules in the “StepStick” form factor used to control individual stepper motors. They are placed right on top of your control board and the stepper motors are wired directly to them. As always there are mutliple options of driver modules you can buy. The main difference between them ist the amount of Amperage they support and the number of microsteps they can drive a stepper motor with. Amperage is pretty easy to understand and pretty much all of them can support your standard NEMA 17 stepper motors. Microsteps on the other hand needs some more explanation.
A standard NEMA 17 stepper motor can by default be turned exactly one step which corresponds to 1,8°. The so called microstepping means that the driver can turn and hold the stepper motor in smaller increments. The A4988 driver supports 16 Microsteps for example which means it can turn the stepper motor in 1/16th of a step increments or just 0,1125°. This is obviously important for the precision of your machine. As a reference: With a 16 tooth gear and a 2mm belt pitch you have 0,01mm of precision per Microstep.
Three chips are commonly used for stepper drivers. A4988, DRV8825 and TMC2xxx (2100/2130/2208). Some less commonly used ones are MP6500 with less precision and the TB67S249FTG which is relatively expensive.
A4988
The A4988 is the least expensive one of the three with also the least precision with just 16 Microsteps. It can handle up to 2Amps per Phase with a heatsink.
DRV8825
Double the amount of Microsteps can you get with the DRV8825. 32 Microsteps and a maximum of 2,5Amps is what you get for nearly double the price.
TMC2xxx (2100/2130/2209)
The pricey option of the three are definitely the TMC2xxx chips. They should generally be compatible to all boards supporting the A4988 and DRV8825 chips but they cost way more than both of them. Their exact amperage depends on the specific model but they are usually around the 2-2,5Amps max as well. It’s starting to get interesting when you look at the number of Microsteps though. They are all driver by just 16 Microsteps but they upsample the Microsteps to 256. So for the highest precision you’ll want these bad boys.
When choosing the right driver for your needs keep in mind that you don’t need the same driver for all your stepper motors. You could get some more precise TMC ones for your X and Y-axis and get a cheaper one for your Z-Axis. Also the amount of noise your machine produces depends on the drivers. If you later find out that the drivers you bought are not right for you, you can still always replace them fairly easily. Just remember to disconnect everything from electricity before doing any maintenance and you are good to go.
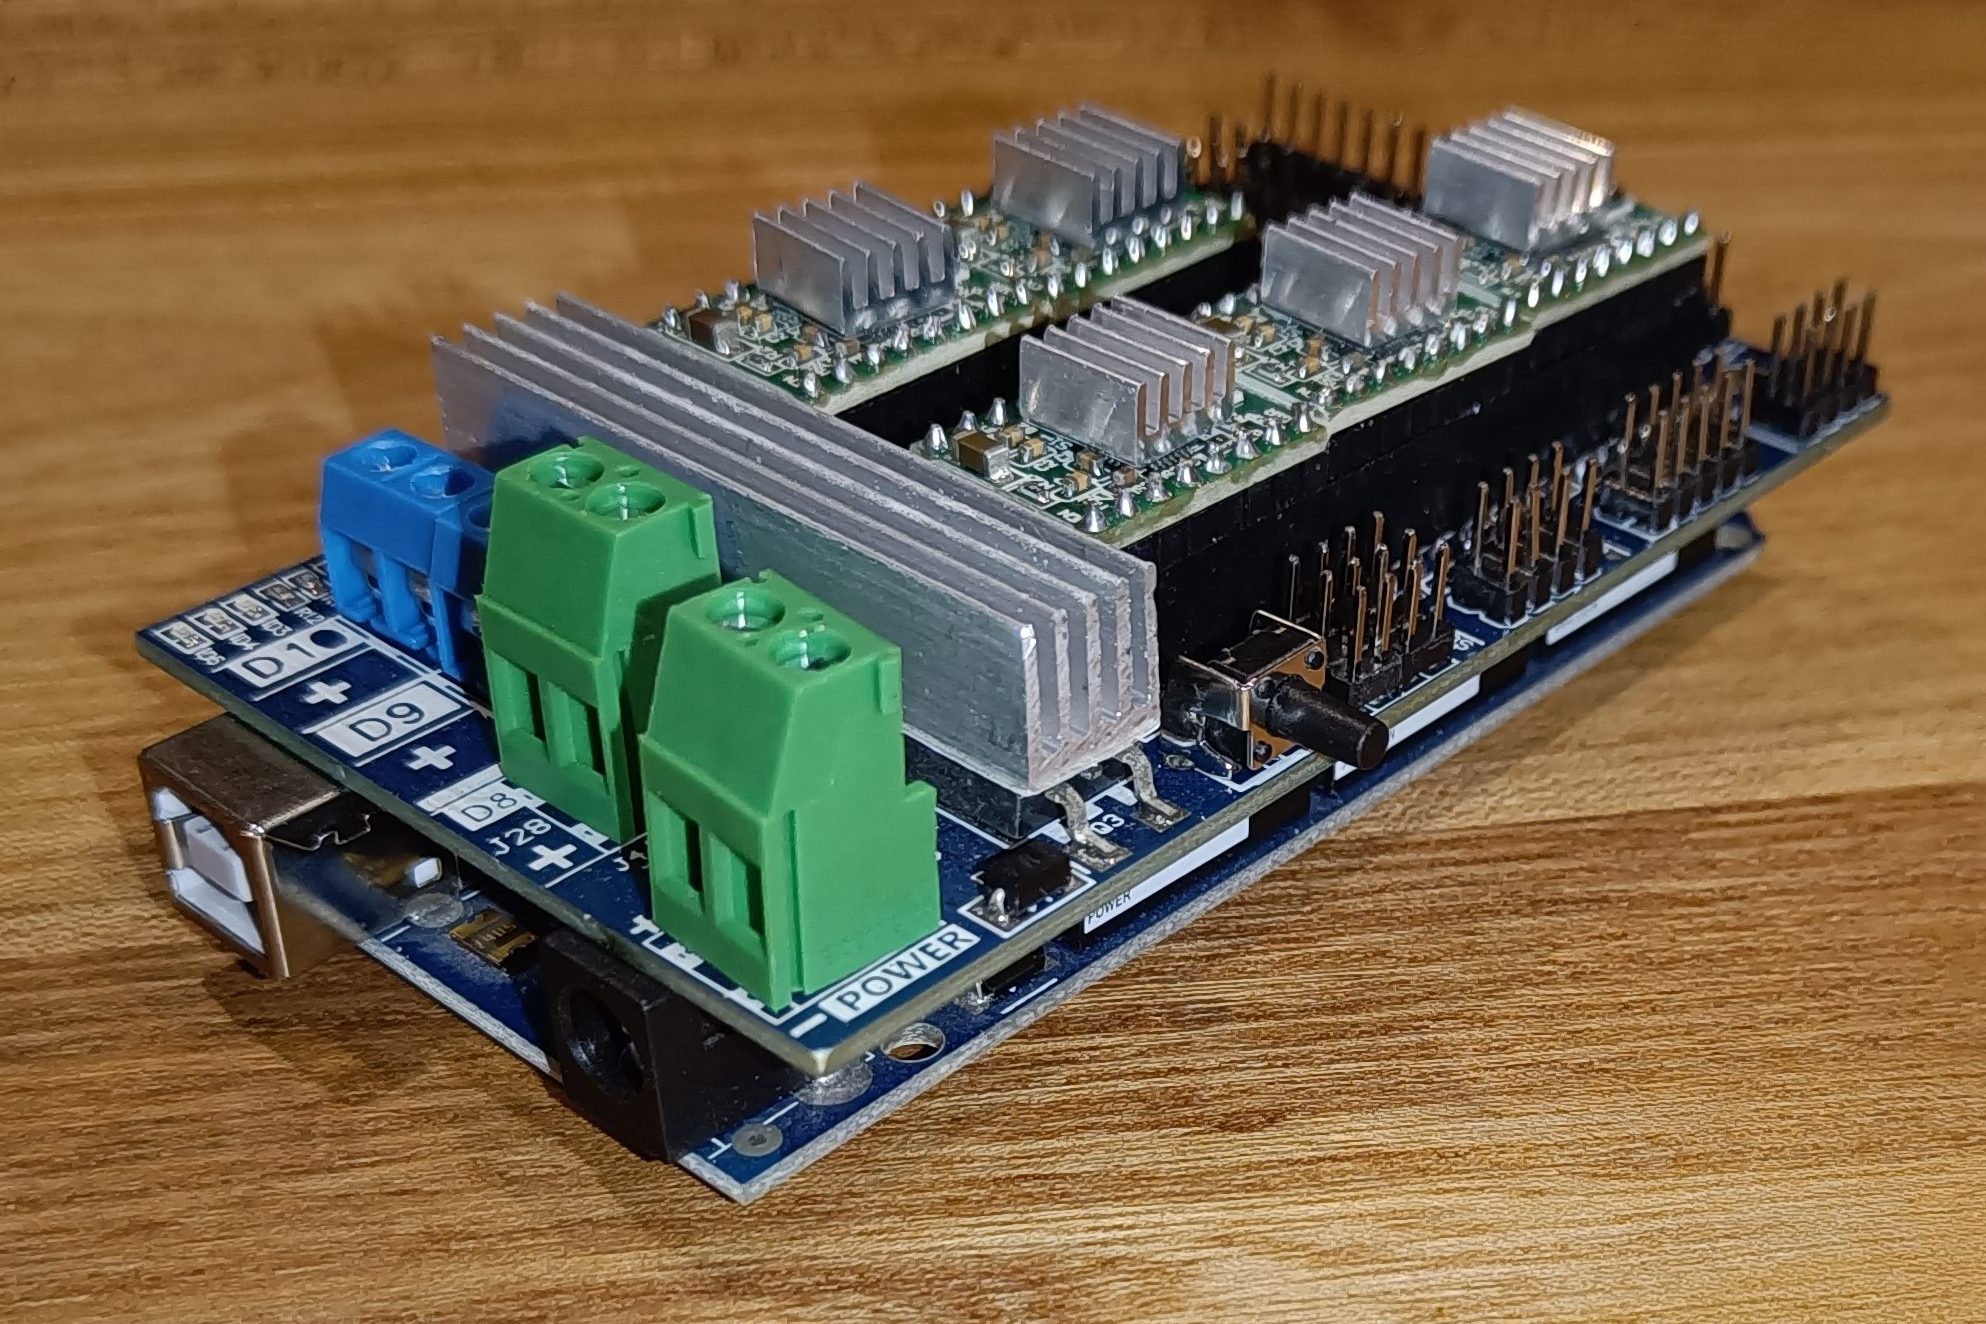
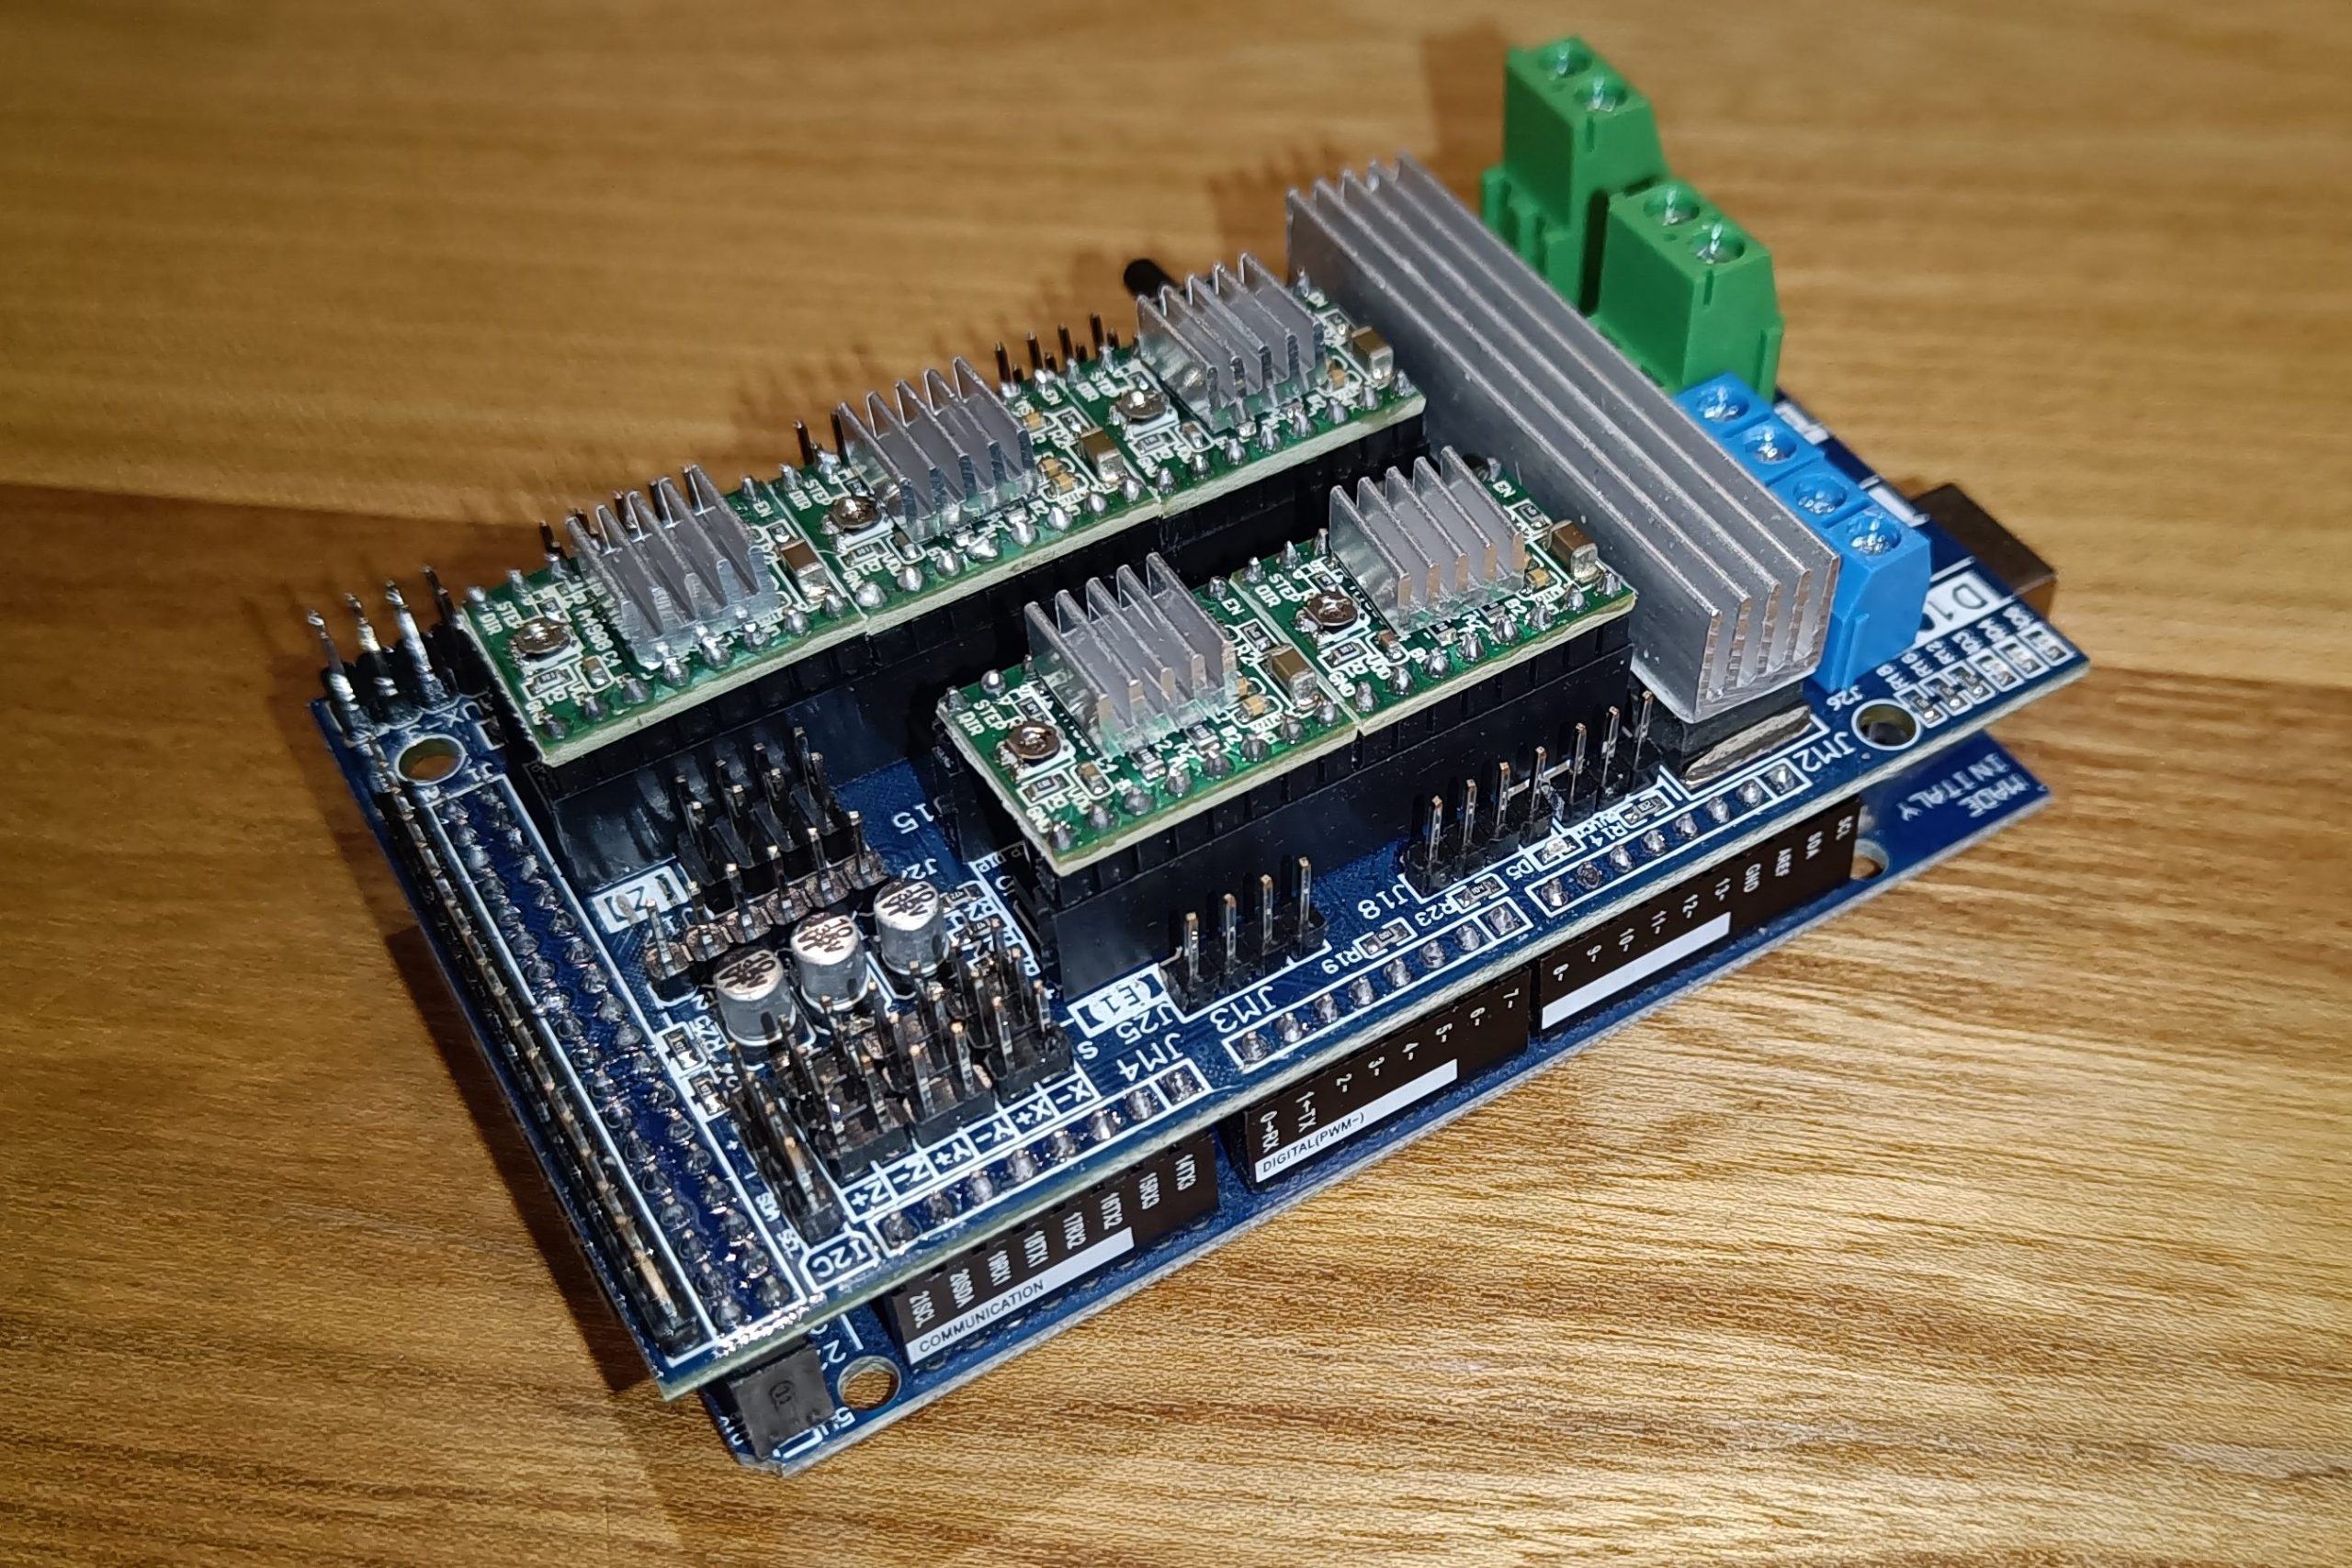
The finished cnc controller I will be using
My trusty Arduino Mega at the bottom. A Ramps 1.6 board on top and five A4988s on top of it. The cost for the stepper drivers and the Ramps was about 20€ on Amazon.
Arduino mega at the bottom, Ramps 1.6 in the middle and 5 A4988s on topAgain the complete package but photographed
Further references
German site comparing different Arduino based control boards.
German site comparing different Arduino based control boards
Autosquaring uses the ability to run two stepper motors on the same axis independently from each other to ensure all the axis are square to each other and the frame. ↩︎